Set up bidirectional sync for Git Experience
By default, Harness Git Experience syncs unidirectionally, from Harness to your Git repos. You can also have Harness Git Experience sync bidirectionally between Harness and your Git repo.
With bidirectional sync for Git Experience, changes made on either the Git repo or Harness are synched automatically.
This topic explains how to set up and use bidirectional sync.
Supported Entities
Generally Available
- Pipelines
- Templates
- Input Sets
- Services
- Environments
- Infrastructure
Important notes
- If users make changes on the Harness and Git side at the same time, precedence is given on a first come, first served basis.
- Customers using the current unidirectional sync (Harness --> Git) functionality can migrate to bi-directional sync using the steps in this topic. The process involves enabling an account-level setting.
- If you make an invalid YAML change to the YAML in the Git repo file an Invalid YAML Detected error appears in the Harness UI. You can fix the invalid YAML in Harness or in the Git repo.
- If your Git repo server is on-premise, it must have connectivity to Harness SaaS.
- Currently, only
.yamland.ymlfiles are supported for bi-directional sync. - When configuring a webhook, you need to be the owner of the relevant git repository.
Configure bi-directional sync
To set up bi-directional sync, do the following:
-
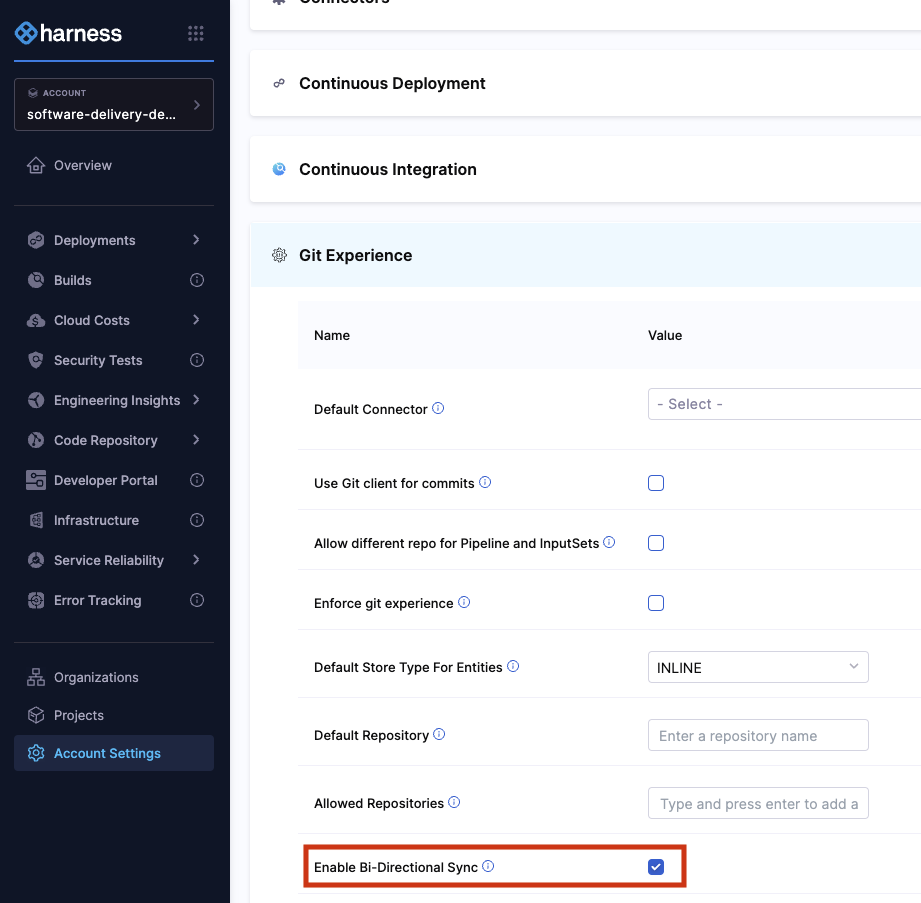
In your Harness account, go to Account Settings, and then select Default Settings.
-
Expand Git Experience, and then enable the Enable Bi-Directional Sync setting.

-
Select Save.
When you create the webhook in Harness, it is automatically registered in your repo. For webhook registration, ensure that the Harness Git connector you use in the steps below has the necessary credentials. For example, for GitHub, ensure that you use a GitHub user account that is a repo admin and that the Personal Access Token includes all repo, user, and admin:repo_hook options for scopes.
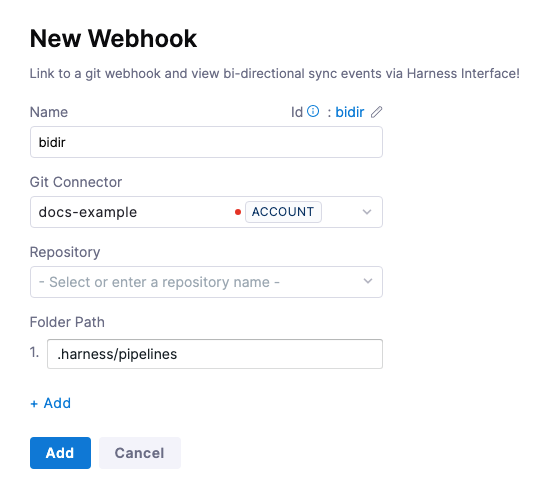
You will need a webhook to your repo to use bi-directional sync:
- In Harness, do one the following, depending on the scope at which you want to create a webhook:
- To configure a webhook at the account scope, go to Account Settings > Account-level Resources > Webhooks, and then select New Webhook.
- To configure a webhook at the organization scope, go to Organization Resources > Organization-level Resources > Webhooks, and then select New Webhook.
- To configure a webhook at the project scope, go to Project Settings > Project-level Resources > Webhooks, and then select New Webhook.
-
In Git Connector, select or create a Harness Git Connector for your repo.
-
In Repository, select the repo where you are going to store the Harness entities, such as pipelines.
-
In Folder Path, enter the path to the location in the repo that stores your Harness entities. Typically, the path starts with
.harnessand is followed by subfolders.
The Folder Path setting is optional. If you omit a folder path, Harness will sync everything in the repo.
-
Select Add. The webhook is added. You can navigate to your repo webhook settings to see the new webhook.
In the Webhooks page, you can see the Events tab. Once you have synched an entity with the Git repo, the Git events are displayed here. You can view Git event Ids for troubleshooting.
Sync a Harness entity
For this example, we'll create a new remote pipeline, sync it with the repo, make a change on the Git side, and then see the change on the Harness side.
- In Harness, in Pipelines, select Create a Pipeline.
- In How do you want to setup your pipeline?, select Remote.
- Specify the Git Connector, Repository, and Git branch for storing and syncing the pipeline.
- In YAML Path, you can enter the path to a repo folder where, if needed.
- Select Start. The pipeline is created.
- Add a CD or Custom stage to the pipeline and save it.
- In your repo, confirm that the YAML file for the pipeline exists.
- In your repo, open the YAML file for the pipeline and commit a change. For example, add a
description. - Back in Harness, review the pipeline to see the changes.
Troubleshooting
Harness provides the following troubleshooting features to help you diagnose sync errors:
-
Webhooks page: In Account Settings, Account Resources, Webhooks, you can select the webhook for your Harness entity sync and view each event on the Events tab. For each event, you can select Payload Details to see the payload.
-
View Webhook Events: in the Git information on your Harness entity, you can select View Webhook Events and see each event and payload for that entity.
