Code coverage
You can add code coverage to a Harness CI pipeline by configuring code coverage tools in your codebase and adding code coverage commands to steps that run tests.
This documentation is not exhaustive. For information about languages or code coverage tools not described here, refer to the documentation for that tool or language.
For more information about running tests in Harness CI, go to Run tests in CI pipelines.
Code coverage by language
The following examples show how to include code coverage in a Harness CI pipeline for different languages.
Go
Go has built-in code coverage functionality.
-
Add the following commands to the Run step where you run your tests:
go test -cover -coverprofile=c.out
go tool cover -html=c.out -o coverage.html
For example:
              - step:
                  type: Run
                  identifier: test
                  name: Test
                  spec:
                    shell: Sh
                    command: |-
                      go test -cover -coverprofile=c.out
go tool cover -html=c.out -o coverage.html -
Add a step to upload your code coverage report to cloud storage.
-
Add a step to view your code coverage report on the Artifacts tab.
Java
-
Set up a Java code coverage tool, such as JaCoCo. By including JaCoCo in
pom.xml, themvn testcommand automatically writes a code coverage report to anexecfile. -
Run your tests in a Run step, for example:
                - step:
                  type: Run
                  name: run test
                  identifier: run_test
                  spec:
                    shell: Sh
                    command: |-
                      mvn test
                    reports:
                      type: JUnit
                      spec:
                        paths:
- target/surefire-reports/*.xml -
Store and publish your code coverage report:
- If you're using JaCoCo, use the JaCoCo Drone plugin in a Plugin step. This plugin uploads your JaCoCo code coverage report to S3 and publishes it to the Artifacts tab on the Build details page.
- With other Java code coverage tools:
- Add an Upload Artifacts to GCS step or Upload Artifacts to S3 step.
- Use the Artifact Metadata Publisher plugin to view your code coverage report on the Artifacts tab.
JavaScript
-
If necessary, set up a JavaScript code coverage tool, such as Istanbul. Your test tool may already include code coverage; for example, Istanbul is included with Jest.
-
Add code coverage arguments or commands to the relevant Run step. For example, with Jest, add
--collectCoverage=trueto yourjestcommand.- step:
type: Run
name: Run Jest Tests
identifier: run_jest_tests
spec:
shell: Sh
command: |-
yarn add --dev jest-junit
jest --ci --runInBand --reporters=default --reporters=jest-junit --collectCoverage=true
envVariables:
JEST_JUNIT_OUTPUT_DIR: "/harness/reports"
reports:
type: JUnit
spec:
paths:
- "/harness/reports/*.xml" -
Add a step to upload your code coverage report to cloud storage.
-
Add a step to view your code coverage report on the Artifacts tab.
PHP
The built-in phpdbg tool can generate code coverage reports.
-
Add the following command to the Run step where your run your tests:
phpdbg -qrr vendor/bin/phpunit --coverage-html build/coverage-reportFor example:
              - step:
                  type: Run
                  identifier: test
                  name: Test
                  spec:
                    shell: Sh
                    command: |-
                      mkdir -p /harness/phpunit
                      phpunit --log-junit /harness/phpunit/junit.xml tests
                      phpdbg -qrr vendor/bin/phpunit --coverage-html build/coverage-report
                    reports:
                      type: JUnit
                      spec:
                        paths:
- /harness/phpunit/junit.xml -
Add a step to upload your code coverage report to cloud storage.
-
Add a step to view your code coverage report on the Artifacts tab.
Python
Use these steps to install code coverage tools when you run Python tests in Run steps.
-
Install a Python code coverage tool, such as Coverage.py. Depending on your build infrastructure, you can install this directly on the host machine or use a Run step to set up the test environment at runtime.
             - step:
              type: Run
              identifier: installdependencies
              name: Install dependencies
              spec:
                command: |
                  python3 -m pip install --upgrade pip
                  pip install -r requirements.txt
                  pip install pytest
python3 -m pip install coverage -
Add code coverage commands to the Run step where your run your tests.
          - step:
              type: Run
              identifier: run pytest
              name: Run pytest
              spec:
                command: |
                  coverage run -m pytest --junit-xml=report.xml
                  coverage report
                  coverage html
Coverage.py usageWith Coverage.py, replace the initial
pythonorpytestin your usual test commands withcoverage run.For more information, refer to the Coverage.py quick start guide.
-
Add a step to upload your code coverage report to cloud storage.
-
Add a step to view your code coverage report on the Artifacts tab.
Ruby
Use these steps to install code coverage tools when you run Ruby tests in Run steps.
-
Set up a Ruby code coverage tool, such as SimpleCov.
-
Run your tests in a Run step.
SimpleCov doesn't require additional commands in the Run step since it is loaded in
test/test_helper.rb. -
Add a step to upload your code coverage report to cloud storage.
-
Add a step to view your code coverage report on the Artifacts tab.
Code coverage services
You can use code coverage services with Harness.
Codacy
You can use the Codacy Drone plugin in a Plugin step to upload Golang coverage reports to Codacy.
For other languages, go to the Codacy documentation on uploading coverage data to Codacy.
CodeCov
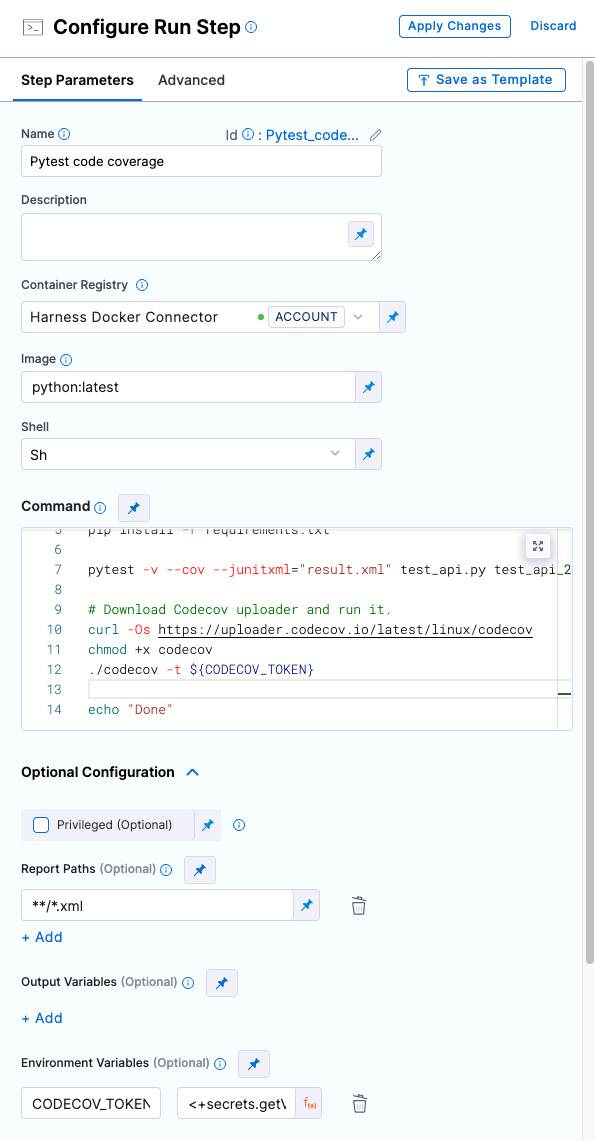
You can use a Run step to include CodeCov code coverage in a Harness CI pipeline. The Run step contains a script that runs tests with code coverage, then downloads and runs the CodeCov Uploader tool.
-
Make sure you have a CodeCov account with code coverage enabled on a code repo and a CodeCov Upload Token. For instructions, go to CodeCov Quick Start.
-
Create a Harness text secret containing your CodeCov Upload Token. Make note of the secret's ID.
-
In your Harness CI pipeline, add a Run step.
-
Enter a Name for the step.
-
Depending on your build infrastructure, you might need to specify a Container Registry and Image containing the binaries that the step needs to run your commands.
For example, you need to run
pytest, and pytest isn't available on the build machine, you must specify a Docker connector and image, such aspytest:latest.For information about when these fields are required and how to specify images, go to Use Run steps.
-
Make sure the Command field includes all commands necessary to prepare the test environment, run tests with code coverage, and download and run the CodeCov Uploader tool, for example:
echo "Run tests with code coverage"
uname -a
pip install pytest
pip install pytest-cov
pip install -r requirements.txt

pytest -v --cov --junitxml="result.xml" test_api.py test_api_2.py test_api_3.py

# Download Codecov uploader and run it.
curl -Os https://uploader.codecov.io/latest/linux/codecov
chmod +x codecov
./codecov -t ${CODECOV_TOKEN} -
In Environment Variables, add a
CODECOV_TOKENenvironment variable and set the value to an expression referencing your CodeCov Upload token secret, such as<+secrets.getValue("my_codecov_upload_token")>. -
Add one or more Report Paths for your code coverage reports.
-
Select Apply Changes to save the step, and then select Save to save the pipeline.
Here are examples of Run steps configured for CodeCov code coverage in the Visual and YAML editors.
- Visual editor
- YAML editor

- step:
    type: Run
    name: Pytest code coverage
    identifier: pytest_code_coverage
    spec:
      connectorRef: account.harnessImage ## Provide a Docker connector ID, if required for your build infrastructure.
      image: python:latest ## Specify an image, if required for your build infrastructure.
      shell: Sh
      command: |-
        # Prepare test environment.
        echo "set up to run tests"
        uname -a
        pip install pytest
        pip install pytest-cov
        pip install -r requirements.txt

        # Run tests with code coverage.
        pytest -v --cov --junitxml="result.xml" test_api.py test_api_2.py test_api_3.py

        # Download Codecov uploader and run it. Uses CODECOV_TOKEN envVariable.
        curl -Os https://uploader.codecov.io/latest/linux/codecov
        chmod +x codecov
        ./codecov -t ${CODECOV_TOKEN}
      reports: ## Specify one or more report paths.
        type: JUnit
        spec:
          paths:
            - "**/*.xml"
      envVariables:
        CODECOV_TOKEN: <+secrets.getValue("my_codecov_upload_token")> ## Reference your CodeCov Upload Token secret in an environment variable.
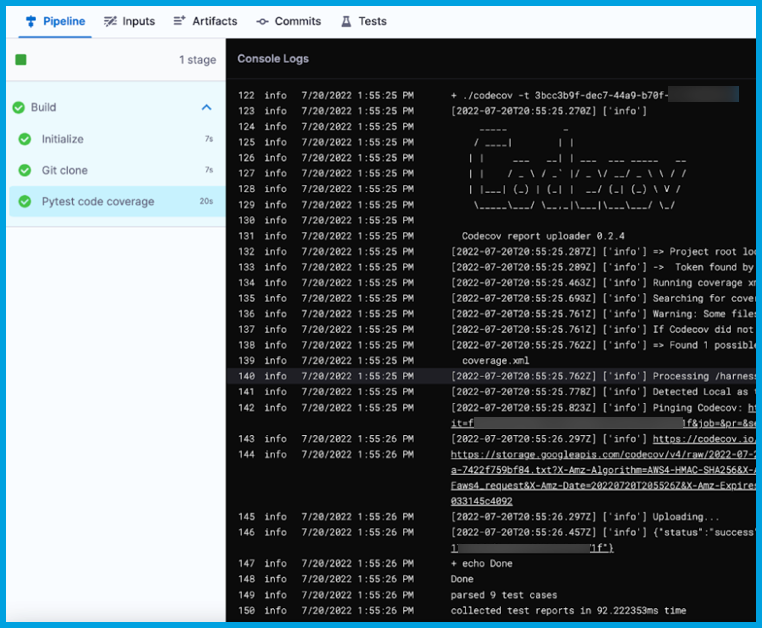
When you run your pipeline, you can review CodeCov information in the Run step's logs on the Build details page. If the results were successfully uploaded to CodeCov, the logs include a resultURL that you can follow to view the code coverage output in your CodeCov account, such as:
...
145  info  [date] [time]    [timestamp] [`info`] Uploading...
146  info  [date] [time]    [timestamp] [`info`] {"status":"success","resultURL":"https://codecov.io..."}
...

Alternately, you can run your tests with code coverage in a Run step and then upload the results to CodeCov by running the CodeCov Drone plugin in a Plugin step.
Coveralls
To integrate Coveralls in your Harness CI pipelines, follow the Coveralls documentation to Integrate Coveralls with your codebase. Note the following:
- For Step 2: Choose an integration, use the Universal Coverage Reporter.
- For Step 3: Configure your project to send coverage to Coveralls:
- Create a Harness text secret for your
COVERALLS_REPO_TOKEN. - Add the
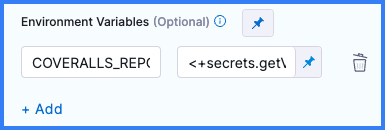
COVERALLS_REPO_TOKENenvironment variable to steps in your CI pipelines that run tests with code coverage. - For the environment variable value, use a Harness expression to reference the encrypted text secret, such as
<+secrets.getValue("YOUR_COVERALLS_SECRET_ID")>.
- Create a Harness text secret for your
Add an environment variable to a step
- Visual
- YAML
- In Harness, edit the step that runs your tests with code coverage.
- Under Environment Variables, select Add.
- Set the key to
COVERALLS_REPO_TOKEN. - Set the value to
<+secrets.getValue("YOUR_COVERALLS_SECRET_ID")>

Add envVariables to the step.spec for the relevant Run or Test step.
              - step:
                  type: Run
                  name: npm test
                  identifier: npm_test
                  spec:
                    shell: Sh
                    command: |-
                      npm install
                      npm run build --if-present
                      npm test
                    reports:
                      type: JUnit
                      spec:
                        paths:
                          - report.xml
                    envVariables:
                      COVERALLS_REPO_TOKEN: <+secrets.getValue("YOUR_COVERALLS_SECRET_ID")>
You can also upload coverage reports to Coveralls by using the Coveralls Drone plugin in a Plugin step.
View code coverage reports on the Artifacts tab
You can use Drone plugins to view code coverage reports on the Artifacts tab on the Build details page.
- Artifact Metadata Publisher plugin
- S3 Upload and Publish plugin
The Artifact Metadata Publisher plugin pulls content from cloud storage and publishes it to the Artifacts tab.
- Visual
- YAML
-
Add steps to your pipeline that run tests with code coverage and produce code coverage reports.
-
Add a step to upload the report artifact to cloud storage.
-
Add a Plugin step that uses the
artifact-metadata-publisherplugin. Configure the Plugin step settings as follows:- Name: Enter a name.
- Container Registry: Select a Docker connector.
- Image: Enter
plugins/artifact-metadata-publisher. - Settings: Add the following two settings as key-value pairs.
file_urls: Provide the URL to the code coverage artifact that was uploaded in the Upload Artifacts step. If you uploaded multiple artifacts, you can provide a list of URLs.artifact_file: Provide any.txtfile name, such asartifact.txtorurl.txt. This is a required setting that Harness uses to store the artifact URL and display it on the Artifacts tab. This value is not the name of your uploaded artifact, and it has no relationship to the artifact object itself.
-
Add steps to your pipeline that run tests with code coverage and produce code coverage reports.
-
Add a step to upload the report artifact to cloud storage.
-
Add a Plugin step that uses the
artifact-metadata-publisherplugin, for example:- step:
type: Plugin
name: publish artifact metadata
identifier: publish_artifact_metadata
spec:
connectorRef: account.harnessImage
image: plugins/artifact-metadata-publisher
settings:
file_urls: ## Provide the URL to the code coverage artifact that was uploaded in the Upload Artifacts step. If you uploaded multiple artifacts, you can provide a list of URLs.
artifact_file: artifact.txt ## Provide any '.txt' file name. Harness uses this to store the artifact URL and display it on the Artifacts tab. This value is not the name of your uploaded artifact, and it has no relationship to the artifact object itself.
The S3 Upload and Publish plugin uploads a specified file or directory to AWS S3 and publishes it to the Artifacts tab.
- Visual
- YAML
-
Add steps to your pipeline that run tests with code coverage and produce code coverage reports.
-
Add a Plugin step that uses the
drone-s3-upload-publishplugin. Configure the Plugin step settings as follows:- Name: Enter a name.
- Container Registry: Select a Docker connector.
- Image: Enter
harnesscommunity/drone-s3-upload-publish. - Settings: Add the following seven settings as key-value pairs.
aws_access_key_id: An expression referencing a Harness secret or pipeline variable containing your AWS access ID, such as<+pipeline.variables.AWS_ACCESS>aws_secret_access_key: An expression referencing a Harness secret or pipeline variable containing your AWS access key, such as<+pipeline.variables.AWS_SECRET>aws_default_region: Your default AWS region, such asap-southeast-2aws_bucket: The target S3 bucket.artifact_file: Provide any.txtfile name, such asartifact.txtorurl.txt. This is a required setting that Harness uses to store the artifact URL and display it on the Artifacts tab. This value is not the name of your uploaded artifact, and it has no relationship to the artifact object itself.source: Provide the path, in the build workspace, to the file or directory that you want to upload. If you want to upload a compressed file, you must use a Run step to compress the artifact before uploading it.target: Optional.
- Image Pull Policy: Select If Not Present
-
Add steps to your pipeline that run tests with code coverage and produce code coverage reports.
-
Add a Plugin step that uses the
drone-s3-upload-publishplugin, for example:- step:
type: Plugin
name: s3-upload-publish
identifier: custom_plugin
spec:
connectorRef: account.harnessImage
image: harnesscommunity/drone-s3-upload-publish
settings:
aws_access_key_id: <+pipeline.variables.AWS_ACCESS> ## Reference your AWS access ID.
aws_secret_access_key: <+pipeline.variables.AWS_SECRET> ## Reference to your AWS access key.
aws_default_region: ap-southeast-2 ## Set to your default AWS region.
aws_bucket: bucket-name ## The target S3 bucket.
artifact_file: artifact.txt ## Provide any '.txt' file name. Harness uses this to store the artifact URL and display it on the Artifacts tab. This value is not the name of your uploaded artifact, and it has no relationship to the artifact object itself.
source: path/to/target/artifact.xml ## Provide the path to the file or directory that you want to upload.
target: <+pipeline.name>/<+pipeline.sequenceId> ## Optional. Provide a path, relative to the 'aws_bucket', where you want to store the artifact. Do not include the bucket name. If unspecified, Harness uploads the artifact to the bucket's main directory.
imagePullPolicy: IfNotPresent
For aws_access_key_id and aws_secret_access_key, use expressions to reference Harness secrets or pipeline variables containing your AWS access ID and key. You could also use expressions for target, such as <+pipeline.name>/<+pipeline.sequenceId>, which would automatically organize your artifacts into directories based on the pipeline name and incremental build ID.
If you want to upload a compressed file, you must use a Run step to compress the artifact before uploading it.
Code coverage reports are not the only artifacts you can publish to the Artifacts tab. You can publish any URL to the Artifacts tab.